

This informational guide is a resource for engineers to use when installing a wireless internet service provider (WiSP) on an OEC 9900. It's designed to assist you through the installation process and help you resolve common issues that may arise.
Whether you're a seasoned professional or new to working with the OEC 9900, this guide aims to provide clear, step-by-step instructions to ensure a smooth and successful installation.
In this guide, we will cover:
- Tools You'll Need
- How to Remove a GE OEC WiSP
- How to Configure a WiSP: Method #1
- How to Configure a WiSP: Method #2
- Common WiSP Problems and Solutions
IMPORTANT NOTE: This guide assumes that the WiSP is being installed on an OEC 9900 that has already had one installed.
Looking to purchase a GE OEC WISP?
Click the button below to contact our Parts team directly. They are available 24/7 to provide you with a quote and answer any questions you may have.

TOOLS YOU'LL NEED
Before you begin, make sure you have the following tools at hand!
· Phillips screwdriver
· T15 Torx driver
· Digital DVI cable
· Keyboard/ Mouse
With these tools and this guide, you will be well-equipped to install and troubleshoot your WiSP on the GE OEC 9900 efficiently. Let’s get started!
How to Remove a GE OEC WiSP
Step 1. Before starting, turn off the workstation's main power. Take off the top back cover behind the LCD monitors. Unplug the WiSP's power cable found under this cover by using a slim screwdriver to press the release mechanism.
Finally, unplug the WiSP's Ethernet cable, located under the workstation's bottom right panel near the handle.
Step 2. Remove the two Phillips screws on the bottom of the WiSP, and the plastic cover.
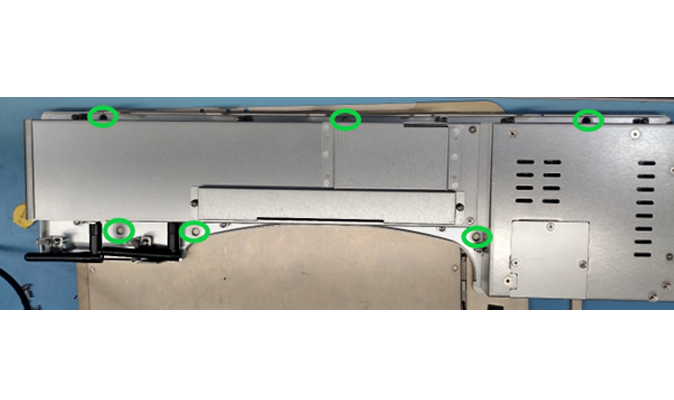
Step 3. Remove the six Torx screws that secure the WiSP to the side panel of the workstation. Carefully feed the power and ethernet cables through the workstation chassis.
Step 4. Reverse steps 1-3 to install the replacement WiSP. Note: Keep the original WiSPs cover and chassis together as they are serialized.
How to Configure a WiSP: Method #1
Use a new compact flash card with an unconfigured WiSP operating system.
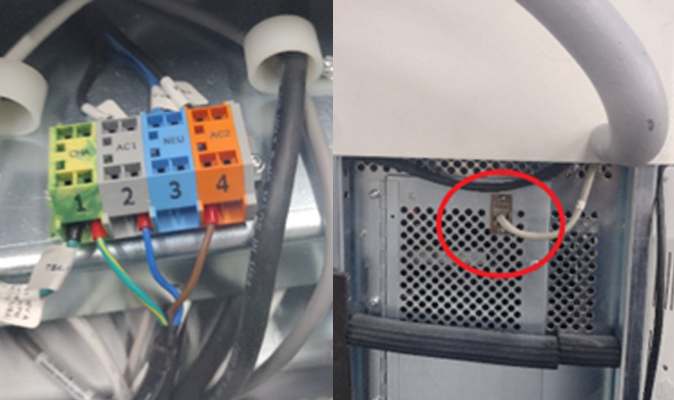
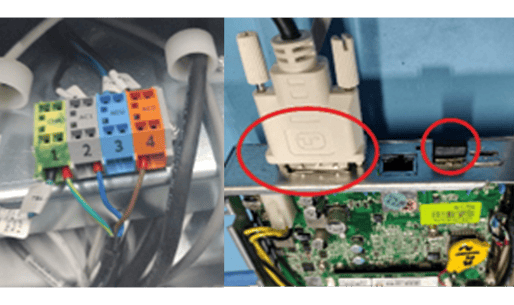
Step 1: Connect the WiSP to the 9900 workstation's external ethernet port, power distribution block, and right-hand monitor using a Digital DVI cable.
- The green wire (ground) goes to terminal #1.
- The Blue wire (neutral) goes to terminal #2.
- The brown wire (hot) goes to terminal #4. You will also need to connect a keyboard and touchpad combo for the configuration process.

Step 2. Power the machine on. Using the keyboard/touchpad combo, log into the WiSP with the default password “geoecwisp”.
Note: The LEDs on the front panel of the WiSP will not light up or indicate activity until after the WiSP has been configured.
Step 3. From the Windows CE desktop double click the WiSPConfig icon.
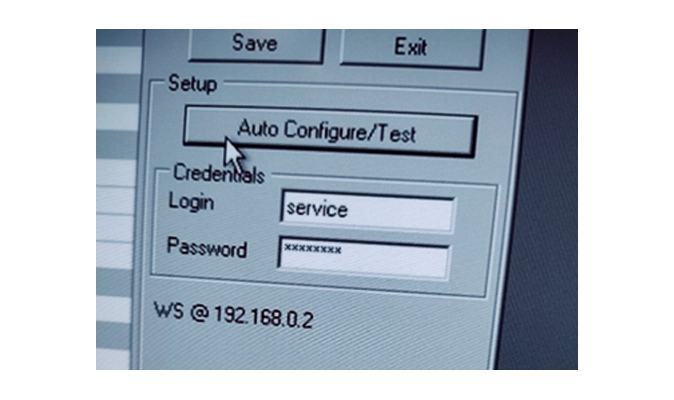
Step 4. Click the Auto Configure/Test Icon on the right side of the WiSP configuration manager. If the connected workstation is set up correctly, you'll see "WS @ 192.168.0.2" under the login details, showing the WiSP is connected to the workstation.
Step 5. Enable the Wi-Fi and/or USB support
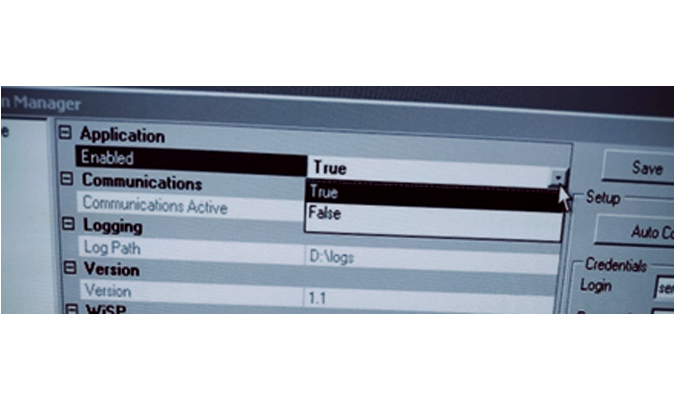
In the WiSP configuration app, click the Wireless tab on the left. Turn the application-enabled dialog to true to use WiFi. If asked for a password, use "iamageds".
To enable the USB feature, click the USB tab and switch the dialog to true. Remember, the WiSP does not support most USB 3.0 storage devices.T
Next, click the Save button at the top right. The WiSP will require a restart after this save. Once rebooted, log back into the desktop.
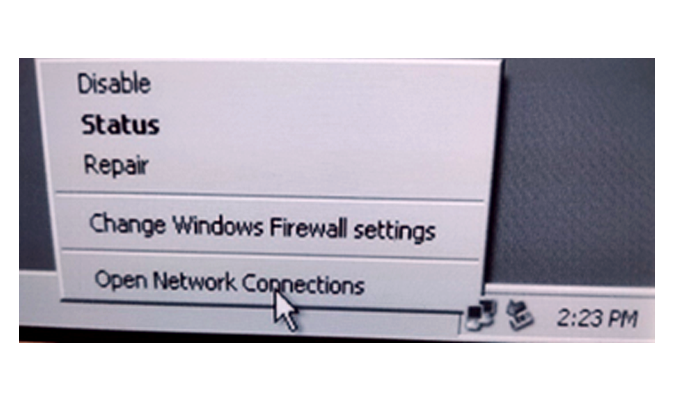
Step 6. On the bottom right of the screen in the system tray right right-click the network icon and left-click open network connections.
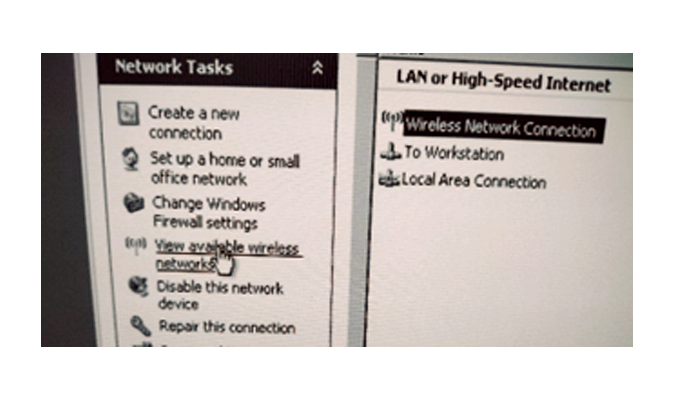
Step 7. Enable the Wi-Fi on the network connections page. Then left-click view available networks from the left column.
Note: If a LAN cable is plugged into the WiSPs external ethernet port, the WIFI will be temporarily disabled. Additionally, the small switch on the back of the WiSP can disable the WIFI hardware.
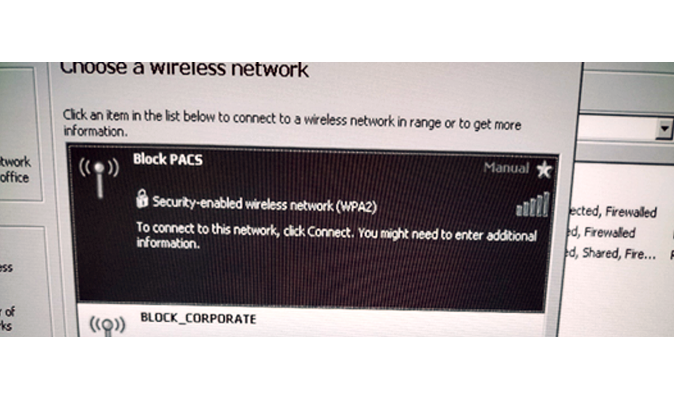
Step 8. Select the Health Service Providers WIFI DICOM/PACS network and connect. You’ll be prompted to enter the network key and connect. (Typically you’ll obtain the network key from the IT department for the Health Service Provider)
IMPORTANT NOTES:
- To use a static IP configuration, you’ll need to set this up in the WiSP's Windows network configuration settings.
- After adjusting Wisp's network settings in Windows, save them in the WiSP configuration manager to avoid losing them when the WiSP reboots.
Step 9.
If you're using an Ethernet connection, plug one end of the Ethernet cable into the WiSP's back port and the other end into the Health Services Provider's LAN. You might need to get LAN settings from their IT department. Also, if the network uses MAC address filtering, you'll have to give the WiSP's MAC address to IT.
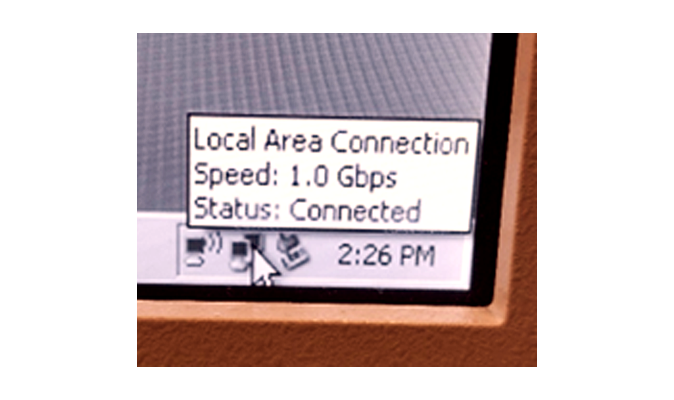
To check the connection, hover over the network icon in the system tray. To find the WiSP's MAC address, go to the desktop and open "Run" from the start menu. Type "cmd.exe" to open a command prompt, then type "ipconfig /all". The MAC address for each network adaptor will be displayed under the “Physical Address” sections.
Step 10. Reboot the wisp. Disconnect the DVI cable from the WiSP and reconnect the workstations righthand display to the workstation.
Step 11. After putting the workstation back together, ask someone on-site to test it. Ideally, this person should know how to export patient information, whether it’s via USB, WIFI to a DICOM server, or Ethernet to a DICOM server.
How to Configure a WiSP: Method#2
Swapping the compact flash card and installing it in a new unit.
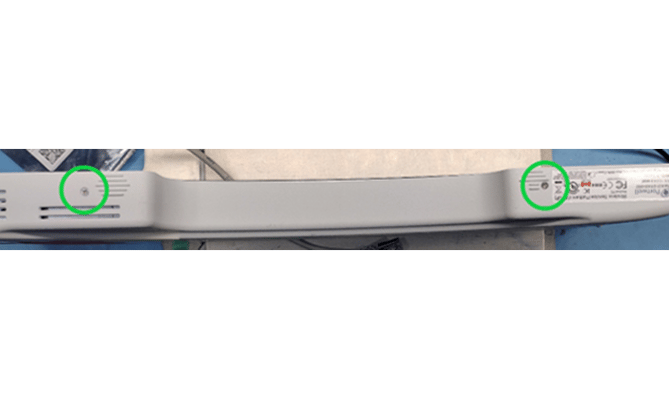
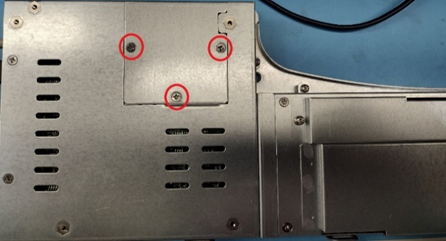
Step 1. Remove the plastic cover from the WiSP by removing the two screws on the bottom pictured below.

Step 2. Locate the compact flash card compartment and remove the three screws retaining the cover.
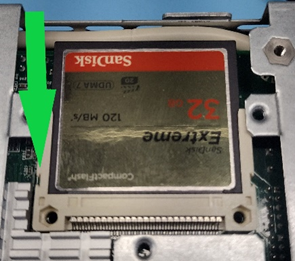
Step 3. Remove the compact flash card from the old WiSP and install it into the new one. Assuming the card is not corrupted it should retain the original operating system and configuration.
Step 4. Connect the new WiSP to the 9900 workstation, boot and test.
Note: Using this method keeps the settings, but the WiSP's MAC address will change. If the network filters by MAC address for security, tell the IT department the new MAC address to connect the WiSP to the network.
To find the new MAC address, log into the WiSP desktop, go to "Run" from the start menu, type "cmd.exe" to open a command prompt, and then type "ipconfig /all". The MAC address will be listed under "Physical Address" for each adapter.
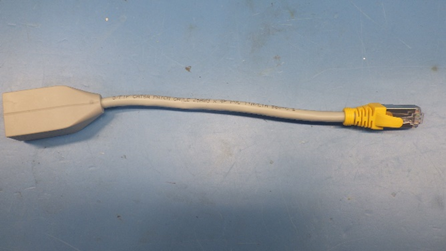
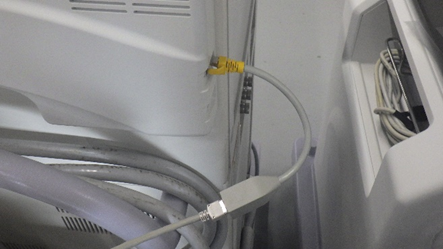
Optional Ethernet Breakaway cable
A Breakaway cable may have been included with your Wisp to prevent accidental ethernet port damage. The cable should be installed between the wisp and the hospital's ethernet cable. (See the photo below.)
Common WiSP Problems and Solutions
The Takeaway
We hope this guide serves as a valuable resource for troubleshooting your GE OEC WiSP Network Interface. Your success is our priority, and we're here to support you every step of the way.
If you continue to experience issues, don't hesitate to contact our team of experienced engineers. They are ready to assist you with any challenges you may face!
Looking to purchase a GE OEC WISP?
Click the button below to contact our Parts team directly. They are available 24/7 to provide you with a quote and answer any questions you may have.


.png)